To change title, all you have to do is change `title` in `kubejs/config/client.properties`.
To change icon, you create a `kubejs/config/packicon.png` image in standard Minecraft texture size preferably (64x64, 128x128, 256x256, that kind of size).
The image has to be saved as 32-bit PNG, not Auto-detect/24-bit, otherwise you will get a JVM crash!
Here's how to do that in PaintNET: 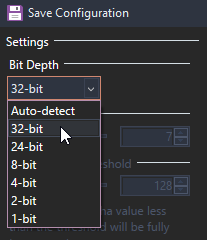 Example result:  Currently incompatible with Fancy Menu!
# Loading Assets and Data You can also use KubeJS to load assets from resource packs and data from datapacks! While this isn't the only method, its one of the easiest. Other options are [loading datapack jsons programmatically](https://mods.latvian.dev/books/kubejs-legacy/page/datapack-load-events) <TODO: one for assets>. The `kubejs/data` folder is loaded identically to the `pack/data` folder in a datapack and the `kubejs/assets` folder is loaded identically to the `pack/assets` folder in a resourcepack. ##### Step by step for importing Datapacks and Resourcepacks 1. Make sure that you have permission from creator of the resourcepack or datapack to have their word *embedded* in your pack 2. If your resourcepack or datapack is a `.zip` file, unzip it 3. Inside there should be a file and a folder named either `data` or `assets`, go into that folder 4. In you `kubejs` folder in your instance their should be a folder with the same name as you just found 5. Transfer the contents (1 or more folders) from the resourcepack or datapack to the one inside of kubejs ##### Different places to put things that you should know - `kubejs/assets/kubejs/textures/item` where you put item textures (png) and mcmeta files - `kubejs/assets/kubejs/textures/block` where you put block textures (png) and mcmeta files - `kubejs/assets/kubejs/textures/fluid` where you put fluid textures (png) and mcmeta files - `kubejs/assets/kubejs/models/block` where you put block models files (json) - `kubejs/assets/kubejs/models/item` where you put item models files (json) - `kubejs/assets/kubejs/sounds` where you put sounds (ogg) - `kubejs/assets/kubejs/sounds.json` where you do *client* sound registry ##### How to change the textures models or what ever else of other mods 1. Find the mod jar and extract it (you might need to rename to a zip temporarily if you don't have the right tools) 2. Inside you should find `assets` and `data` folder inside should a folder with the mod then further sub folders and various assets and data-s 3. For example `example-v3.42.5.jar/assets/example/textures/item/foo/thingggy.png` 4. Now make this exact folder path in the kubejs folder `kubejs/assets/example/textures/item/foo/thingggy.png`, but use a different image (or whatever) # Default Options You can ship default options from options.txt with KubeJS. This includes keybindings, video settings, enabled resource packs, controls like autojump and toggle sprint and wierd things like advanced tooltips. Why use this instead of just shipping options.txt? If you ship options.txt then the users options will get overridden every time they update your modpack, where-as KubeJS only sets the options once, on the first time the modpack boots. To use it simply make a file called `defaultoptions.txt` in the `kubejs/config` folder. Then copy any lines you want to set by default over from the normal options.txt file. You can also just copy the entire file if you want to include everything. A full list of what options the options.txt file can contain is available on the Minecraft Wiki: [https://minecraft.fandom.com/wiki/Options.txt](https://minecraft.fandom.com/wiki/Options.txt)