Examples
Example scripts for various things you can do with KubeJS
- FTB Quests Integration
- Reflection / Java access
- Painter API
- Units
- Network Packets
- Starting Items
- FTB Utilities Rank Promotions
- Clearlag 1.12
- Scheduled Server Events
- Running Commands
- Spawning Entities
FTB Quests Integration
onEvent('ftbquests.custom_task.75381f79', event => {
  log.info('Custom task!')
  event.checkTimer = 20
  event.check = (task, player) => {
    if (player.world.daytime && player.world.raining) {
      task.progress++
    }
  }
})

onEvent('ftbquests.custom_reward.e4f76908', event => {
  log.info('Custom reward!')
  event.player.tell('Hello!')
})

// specific object completion
onEvent('ftbquests.completed.d4f36905', event => {
  if (event.player) {
    event.notifiedPlayers.tell(Text.of(`${event.player.name} completed... something!`).green())
  }
})

// generic 'quest' object completion. Note: There isnt actually a way to get reliable title on server side, so dont use event.object.title
onEvent('ftbquests.completed', event => {
  if (event.player && event.object.objectType.id === 'quest') {
    event.notifiedPlayers.tell(Text.of(`${event.player.name} completed a quest!`).blue())
  }
})

// object with tag 'ding' completion
onEvent('ftbquests.completed.ding', event => {
  event.onlineMembers.playSound('entity.experience_orb.pickup')
})

onEvent('entity.death', event => {
  if(event.server
  && event.source.actual
  && event.source.actual.player
  && event.source.actual.mainHandItem.id === 'minecraft:wooden_sword'
  && event.entity.type === 'minecraft:zombie') {
    event.source.actual.data.ftbquests.addProgress('12345678', 1)
  }
})
Reflection / Java access
Very limited reflection is possible, but is not recommended. Use it in cases when KubeJS doesnt support something.
In 1.18.2+ internal Minecraft classes are remapped to MojMaps at runtime, so you don't have to use obfuscated names if accessing internal Minecraft fields and methods.
An example of adding a block with a custom material, built using reflection to get the MaterialJS class, then make a new instance of that with amethyst sounds and material properties from internal Minecraft classes.
// Startup script, 1.18.2
const MaterialJS = java("dev.latvian.mods.kubejs.block.MaterialJS")
const Material = java('net.minecraft.world.level.material.Material')
const SoundType = java('net.minecraft.world.level.block.SoundType')

amethystMaterial = new MaterialJS('amethyst', Material.AMETHYST, SoundType.AMETHYST) // f_164531_ and f_154654_ are the respective obfuscated names of these fields, for older versions

//This builder uses 1.18.2 syntax, it will not work in 1.16 or 1.18.1
onEvent('block.registry', event => {
	event.create('amethyst_slab', 'slab')
		.material(amethystMaterial)// Use the new MaterialJS instance we created as the material
		.tagBlock('minecraft:crystal_sound_blocks')
		.tagBlock('minecraft:mineable/pickaxe')
		.requiresTool(true)
		.texture('texture', 'minecraft:block/amethyst_block')
})
This does come at a cost, it takes 1-2 seconds to load this script, instead of the normal milliseconds. You should import your classes at the top of the script, instead of in an event, especially if the event gets triggered more than once.
Painter API
About
Painter API allows you to draw things on the screen, both from server and directly from client. This can allow you to create widgets from server side or effects on screen or in world from client side.
Currently it doesn't support any input, but in future, in-game menus or even GUIs similar to Source engine ones will be supported.
Paintable objects are created from NBT/Json objects and all have an id. If id isn't provided, a random one will be generated. Objects x and z are absolute positions based on screen, but you can align elements in one of the corners of screen. You can bulk add multiple objects in one json object. All properties are optional, but obviously some you should almost always override like size and position for rectangles.
paint({...}) is based on upsert principle - if object doesn't exist it will create it (if the object also contains valid type), otherwise, update existing:
event.player.paint({example: {type: 'rectangle', x: 10, y: 10, w: 20, h: 20}})- New rectangle is createdevent.player.paint({example: {x: 50}})- Updates previous rectangle with partial data
You can bulk update/create multiple things in same object:
event.player.paint({a: {x: 10}, b: {x: 30}, c: {type: 'rectangle', x: 10}})
You can remove object with remove: true, bulk remove multiple objects or remove all objects:
event.player.paint({a: {remove: true}})event.player.paint({a: {remove: true}, b: {remove: true}})event.player.paint({'*': {remove: true}})
These methods have command alternatives:
/kubejs painter @p {example: {type: 'rectangle', x: 10, y: 10, w: 20, h: 20}}
If the object is re-occuring, it's recommended to create objects at login with all of its static properties and visible: false, then update it later to unhide it. Painter objects will be cleared when players leave world/server, if its persistent, then it must be re-added at login every time.
Currently available objects
Underlined objects are not something you can create
Root
(available for all objects)
- Boolean visible
- Float x
- Float y
- Float z
- Float w
- Float h
- Enum alignX (one of 'left', 'center', 'right')
- Enum alignY (one of 'top', 'center', 'bottom')
- Enum draw (one of 'ingame', 'gui', 'always')
- Float moveX
- Float moveY
- Float expandW
- Float expandH
rectangle
- Color color
- String texture
- Float u0
- Float v0
- Float u1
- Float v1
gradient
- Color color
- Color colorT
- Color colorB
- Color colorL
- Color colorR
- Color colorTL
- Color colorTR
- Color colorBL
- Color colorBR
- String texture
- Float u0
- Float v0
- Float u1
- Float v1
text
- Text text | Text[] textLines
- Boolean shadow
- Float scale
- Color color
- Boolean centered
- Float lineSpacing
item
- ItemStack item (supports either 'itemid' or vanilla {id: 'item', Count: 4, tag: {...}} NBT syntax)
- Boolean overlay
- String customText
- Float rotation
Properties
- Unit is a Rhino Unit. It can be a number, boolean, color, equation. Every Float, Int, Boolean and Color are also Units, so you can use equations on them.
- Int is a int32 number, any whole value, e.g.
40. - Float is float64 floating point number, e.g
2.35. - String is a string, e.g.
'example'. Textures usually need resource location'namespace:path/to/texture.png'. - Color can be either
0xRRGGBB,'#RRGGBB','#AARRGGBB',e.g.'#58AD5B'or chat colors'red','dark_aqua', etc. RGBAcolor(Float, Float, Float, Float)is also supported where Float is any number between 0.0 and 1.0 (supports Units). - Text can be a string
'Example'orText.of('Red and italic string example').red().italic()etc formatted string.
Available Unit variables
- $screenW - Screen width
- $screenH - Screen height
- $delta - Render delta
- $mouseX - Mouse X position
- $mouseY - Mouse Y position
Available Unit constants
- true - boolean true value, equal to 1.0
- false - boolean false value, equal to 0.0
- PI - number equal to 3.14159265358979323846
- HALF_PI - number equal to 1.57079632679
- TWO_PI - number equal to 6.28318530718
- E - number equal to 2.7182818284590452354
Examples
onEvent('player.logged_in', event => {
event.player.paint({
example_rectangle: {
type: 'rectangle',
x: 10,
y: 10,
w: 50,
h: 20,
color: '#00FF00',
draw: 'always'
},
last_message: {
type: 'text',
text: 'No last message',
scale: 1.5,
x: -4,
y: -4,
alignX: 'right',
alignY: 'bottom',
draw: 'always'
}
})
})
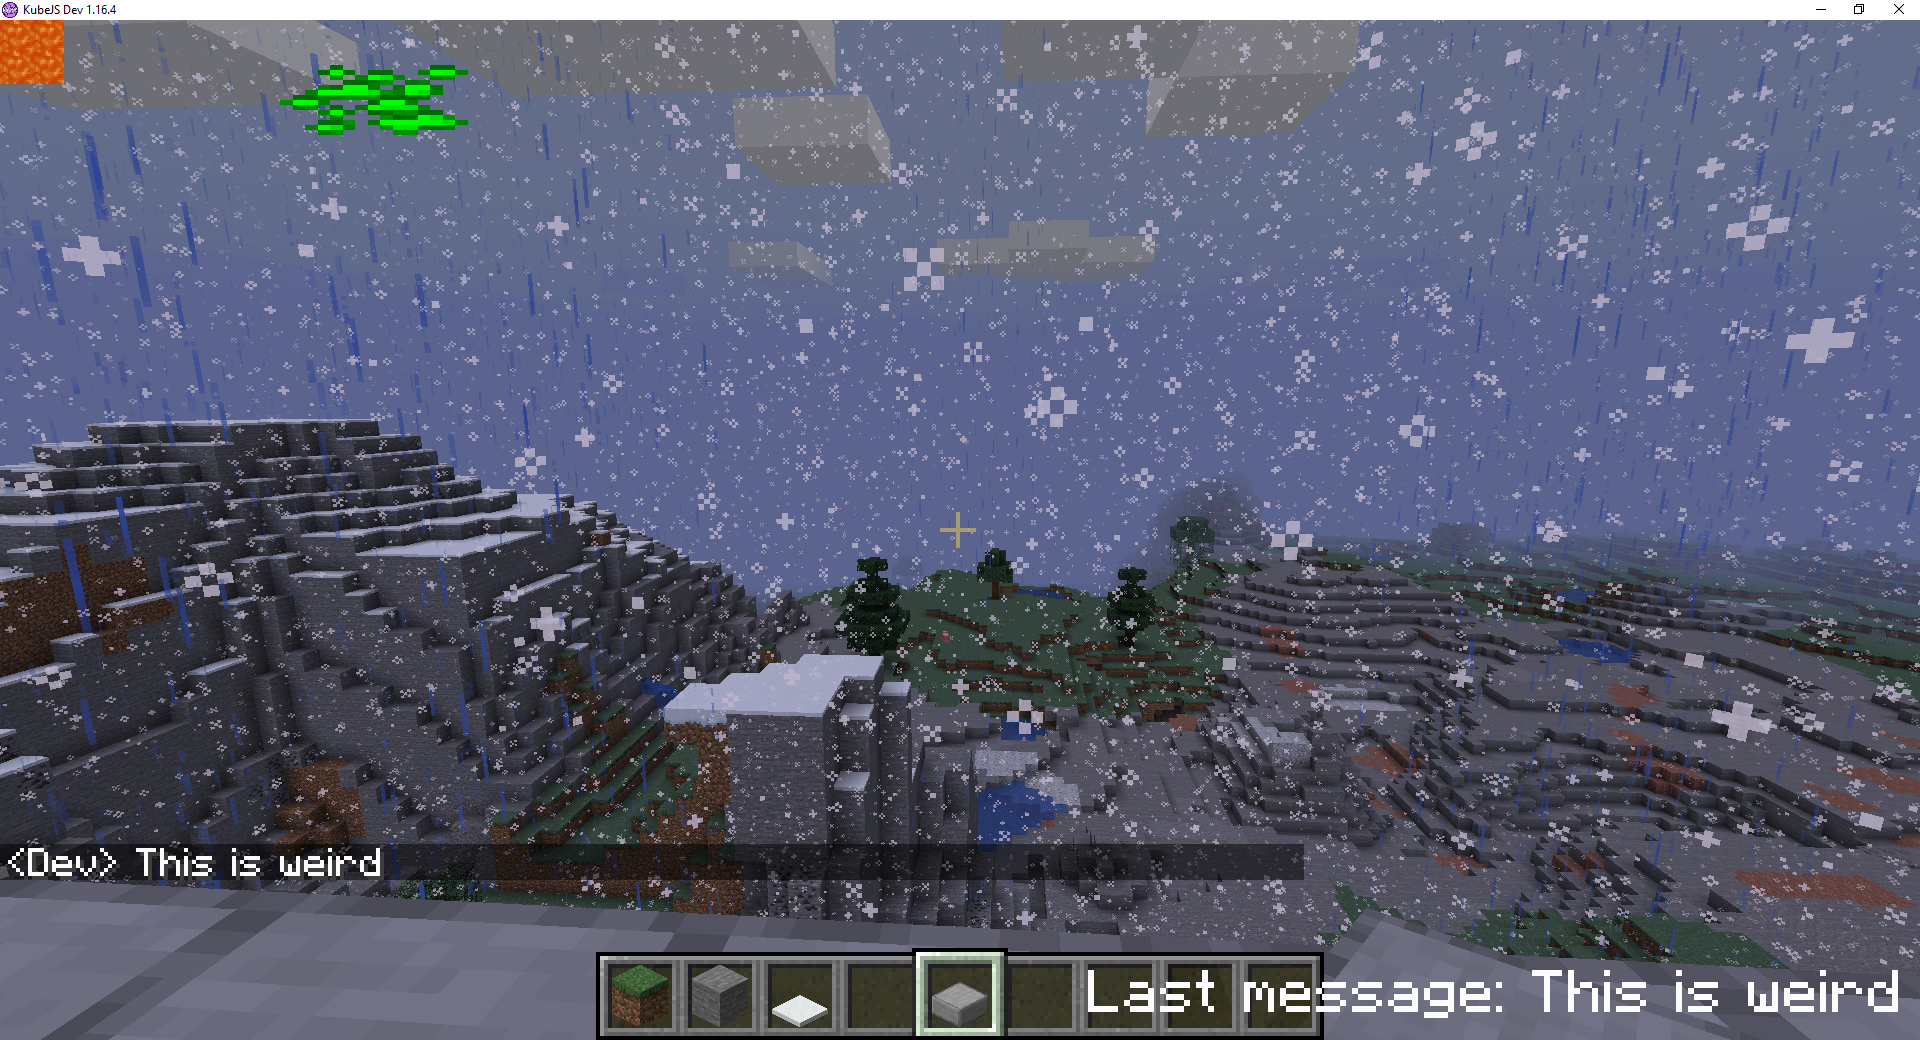
onEvent('player.chat', event => {
// Updates example_rectangle x value and last_message text value to last message + contents from event
event.player.paint({example_rectangle: {x: '(sin((time() * 1.1)) * (($screenW - 32) / 2))', w: 32, h: 32, alignX: 'center', texture: 'kubejs:textures/item/diamond_ore.png'}})
event.player.paint({last_message: {text: `Last message: ${event.message}`}})
// Bulk update, this is the same code as 2 lines above, you can use whichever you like better
// event.player.paint({example_rectangle: {x: 120}, last_message: {text: `Last message: ${event.message}`}})
event.player.paint({lava: {type: 'atlas_texture', texture: 'minecraft:block/lava_flow'}})
})
Units
This page describes all functions and operations available for units
Usage
Most basic unit is plain number, such as '1' or '4.5'.
You can use variables with $ like '$example'.
Each function requires name parenthesis and comma separated arguments e.g. 'min(PI, $example)'.
You can combine as many as you want, e.g. 'min(PI, 10 + $example)'.
You can do pretty complex infix, e.g. 'atan2($mouseY, $mouseX) - HALF_PI - HALF_PI / 2'.
Constants
- true - boolean true value, equal to 1.0
- false - boolean false value, equal to 0.0
- PI - number equal to 3.14159265358979323846
- HALF_PI - number equal to 1.57079632679
- TWO_PI - number equal to 6.28318530718
- E - number equal to 2.7182818284590452354
Operations
- cond ? a : b = TERNARY, if cond then a, else b
- -a = NEGATE
- a + b = SUM
- a - b = SUB
- a * b = MUL
- a / b = DIV
- a % b = MOD
- a ** b = POW
- a & b = BIT AND
- a | b = BIT OR
- a ^ b = BIT/BOOL XOR
- ~a = BIT NOT
- !a = BOOL NOT
- a << b = SHIFT LEFT
- a >> b = SHIFT RIGHT
- a == b = EQUALS
- a != b = NOT EQUALS
- a > b = GREATER THAN
- a < b = LESS THAN
- a >= b = GREATER OR EQUAL THAN
- a <= b = LESS OR EQUAL THAN
Functions
- random()
- time()
- roundTime()
- min(a, b)
- max(a, b)
- pow(a, b)
- abs(a)
- sin(a)
- cos(a)
- tan(a)
- atan(a)
- atan2(y, x)
- deg(a)
- rad(a)
- log(a)
- log10(a)
- log1p(a)
- sqrt(a)
- sq(a)
- floor(a)
- ceil(a)
- if(statement, trueUnit, falseUnit)
Network Packets
This script shows how to use network packets:
// Listen to a player event, in this case item right-click
// This goes in either server or client script, depending on which side you want to send the data packet to
onEvent('item.right_click', event => {
  // Check if item was right-clicked on client or server side
  if (event.server) {
    // Send data {test: 123} to channel "test_channel_1". Channel ID can be any string, but it's recommended to keep it to snake_case [a-z_0-9].
    // Receiving side will be client (because its sent from server).
    event.player.sendData('test_channel_1', { test: 123 })
  } else {
    // It's not required to use a different channel ID, but it's recommended.
    // Receiving side will be server (because its sent from client).
    event.player.sendData('test_channel_2', { test: 456 })
  }
})

// Listen to event that gets fired when network packet is received from server.
// This goes in a client script
onEvent('player.data_from_server.test_channel_1', event => {
  log.info(event.data.test) // Prints 123
})

// Listen to event that gets fired when network packet is received from client.
// This goes in a server script
onEvent('player.data_from_client.test_channel_2', event => {
  log.info(event.data.test) // Prints 456
})
Starting Items
This server script adds items on first time player joins, checking stages. GameStages mod is not required
// Listen to player login event
onEvent('player.logged_in', event => {
  // Check if player doesn't have "starting_items" stage yet
  if (!event.player.stages.has('starting_items')) {
    // Add the stage
    event.player.stages.add('starting_items')
    // Give some items to player
    event.player.give('minecraft:stone_sword')
    event.player.give(Item.of('minecraft:stone_pickaxe', "{Damage: 10}"))
    event.player.give('30x minecraft:apple')
  }
})
FTB Utilities Rank Promotions
With this script you can have FTB Utilities roles that change over time.
Is for 1.12 only. Requires FTB Utilities.
events.listen('player.tick', function (event) {
  // This check happens every 20 ticks, a.k.a every second
  if (event.player.server && event.player.ticksExisted % 20 === 0) {
    var rank = event.player.data.ftbutilities.rank
    events.post('test_event', {testValue: rank.id})
    var newRank = ftbutilities.getRank(rank.getPermission('promotion.next'))

    if (newRank) {
      var timePlayed = event.player.stats.get('stat.playOneMinute') / 20 // Seconds player has been on server
      var timeRequired = newRank.getPermissionValue('promotion.timer').getInt()

      if (timeRequired > 0 && timePlayed >= timeRequired && rank.addParent(newRank)) {
        if (!events.postCancellable('ftbutilities.rank.promoted.' + newRank.id, {'player': event.player, 'rank': newRank})) {
          event.player.tell('You have been promoted to ' + newRank.getPermission('promotion.name') + '!')
        }
        ftbutilities.saveRanks()
      }
    }
  }
})

// When player gets promoted to 'trusted' rank, give them gold ingot (uncomment the line)
events.listen('ftbutilities.rank.promoted.trusted', function (event) {
  // event.data.player.give('minecraft:gold_ingot')
})
3 example roles in ranks.txt:
[player]
power: 1
default_player_rank: true
promotion.name: Player
promotion.next: newcomer
promotion.timer: 5
command.ftbutilities.rtp: false
command.ftbutilities.home: false

[newcomer]
power: 5
promotion.name: Newcomer
promotion.next: regular
promotion.timer: 15
ftbutilities.chat.name_format: <&aNewcomer &r{name}>
command.ftbutilities.rtp: true

[regular]
power: 10
promotion.name: Regular
promotion.next: trusted
promotion.timer: 30
ftbutilities.chat.name_format: <&9Regular &r{name}>
command.ftbutilities.home: true
After 5 seconds of play time, player will be promoted to newcomer.
After 15 seconds (or 10 since previous role) they will be promoted to regular.
After 30 seconds (or 15 since previous role) they will be promoted to trusted, etc.
Clearlag 1.12
This script removes all items from world every 30 minutes. Only works in 1.12.
// Create item whitelist filter that won't be deleted with clearlag
var whitelist = Ingredient.matchAny([
  'minecraft:diamond', // Adds diamond to whitelist
  'minecraft:gold_ingot',
  '@tinkersconstruct', // Adds all items from tinkerscontruct to whitelist
  'minecraft:emerald'
])

// Create variable for last clearlag result
var lastClearLagResult = Utils.newList()
// Create variable for total number of items
var lastTotalClearLagResult = Utils.newCountingMap()

// Create new function that clears lag
var clearLag = server => {
  // Get a list of all entities on server with filter that only returns items
  var itemList = server.getEntities('@e[type=item]')
  // Create new local map for item counters
  var lastResult = Utils.newCountingMap()
  // Clear old result lists
  lastClearLagResult.clear()
  lastTotalClearLagResult.clear()
  // Iterate over each entity in itemList and add item counters
  itemList.forEach(entity => {
    if (!whitelist.test(entity.item)) {
      // Get the name of item
      var key = entity.item.name
      // Add to entity count
      lastResult.add(key, 1)
      // Add to total item count
      lastTotalClearLagResult.add(key, entity.item.count)
      // Kill the item entity
      entity.kill()
    }
  })

  // Update and sort last result list
  lastClearLagResult.addAll(lastResult.entries)
  lastClearLagResult.sort(null)

  // Tell everyone how many items will be removed
  server.tell([
    Text.lightPurple('[ClearLag]'),
    ' Removed ',
    lastTotalClearLagResult.totalCount,
    ' items. ',
    Text.yellow('Click here').click('command:/clearlagresults'),
    ' for results.'
  ])
}

// Listen for server load event
events.listen('server.load', event => {
  // Log message in console
  event.server.tell([ Text.lightPurple('[ClearLag]'), ' Timer started, clearing lag in 30 minutes!' ])
  // Schedule new task in 30 minutes
  event.server.schedule(MINUTE * 30, event.server, callback => {
    // Tell everyone on server that items will be removed
    callback.data.tell([ Text.lightPurple('[ClearLag]'), ' Removing all items on ground in one minute!' ])
    // Schedule a subtask that will clear items in one minute
    callback.data.schedule(MINUTE, callback.data, callback2 => {
      clearLag(callback2.data)
    })
    // Re-schedule this task for another 30 minutes (endless loop)
    callback.reschedule()
  })
})

// Doesnt work in 1.16+!
// Register commands
events.listen('command.registry', event => {
  // Register new OP command /clearlag, that instantly runs clearlag
  event
    .create('clearlag')
    .op()
    .execute(function (sender, args) {
      clearLag(sender.server)
    })
    .add()

  // Register new non-OP command /clearlagresults, that displays stats of all removed items from previous /clearlag
  event
    .create('clearlagresults')
    .execute((sender, args) => {
      sender.tell([ Text.lightPurple('[ClearLag]'), ' Last clearlag results:' ])

      lastClearLagResult.forEach(entry => {
        var total = lastTotalClearLagResult.get(entry.key)

        if (entry.value == total) {
          sender.tell([ Text.gold(entry.key), ': ', Text.red(entry.value) ])
        } else {
          sender.tell([ Text.gold(entry.key), ': ', Text.red(entry.value), ' entities, ', Text.red(total), ' total' ])
        }
      })
    })
    .add()
})
Scheduled Server Events
At server load, you can schedule anything to happen at later time. Within callback handler you can also call callback.reschedule() to repeat this event after initial timer or callback.reschedule(newTime) to change it.
Whatever you pass as 2nd argument will be returned in callback as data.
The example script restarts server after 2 hours but notifies players 5 minutes before that.
onEvent('server.load', function (event) {
  event.server.schedule(115 * MINUTE, event.server, function (callback) {
    callback.data.tell('Server restarting in 5 minutes!')
  })

  event.server.schedule(120 * MINUTE, event.server, function (callback) {
    callback.data.runCommand('/stop')
  })
})
Running Commands
Preface
Sometimes, you might want to run a command (such as /tell @a Hi!), in your code.
Most always, there is better method, but sometimes, you just don't want to learn more complicated topics, and just run a command.
Basic Usage
The most basic usage would be to call runCommand() from a server class.
Utils.server.runCommand(`tell @a Hi!`)If this command returns a message (usually an error) that is normally placed chat, it will be logged. This is not desired outside of debugging situations.
So instead you can use the following to not log these messages.
Utils.server.runCommandSilent(`tell @a Hi!`)If the server is not loaded at the time this is ran, then the code will not work.
Although you can use player.runCommandSilent(), it is not recommend as the command runs with the players permission level.
Using the execute command
Commands are ran in the default dimension (the overworld usually) at 0, 0, 0
To get around this, you can use the execute command:
//This example makes a bedrock box around creepers when they spawn
onEvent('entity.spawned', event => {
	if (event.entity.type != "minecraft:creeper") return // the following code only runs when creepers are spawned
	event.server.runCommandSilent(`execute in ${event.entity.level.dimension} positioned ${event.entity.x} ${event.entity.y} ${event.entity.z} run fill ~-1 ~-1 ~-1 ~1 ~2 ~1 bedrock hollow`)
})
Spawning Entities
Basics
Overview
Spawning entities consists of 3 steps:
- Making the variable storing the future entity
- Modifying the attributes of the entity
- Spawning the entity
Making a variable to store the entity
Example
level is just a placeholder, in your code it needs to be defined, for many events you can use event.level in place of level and it will work
You can create a entity from a block instead of level, and this is often preferred to learn that, scroll to that section afterward
let myEntity = level.createEntity("cow")Breaking down the example
- let
- Indicate that we are making a new variable and get the game ready to store it.
- Not required in 1.16.
- myEntity
- This is the name of the variable.
- Can be anything you chose that is a-Z,0-9 without spaces (you know like any other variable).
- =
- sets myEntity to what is about to follow.
- level
- This is any level object that you choose.
- This can be obtained numerous ways and will depend on what you are trying to do.
- In many events you can use
event.levelto get the level. - Note: this is a LevelJS object, not a minecraftLevel object.
minecraftLevel.asKJS()returns a LevelJS.
- .
- The dot operator either
- Gets a property of the object.
- Calls a method of the object.
- Calls a beaned method of the object.
- In this case it is used to call the method
createEntity. You can tell because the following parenthesis mean its a method.
- The dot operator either
- createEntity(...)
- As mentioned above is the method called by the dot operator
- "cow"
- this is the name of the entity
- "minecraft:cow" or "create:potato_projectile" are also valid
- in fact when you put a resource location without a prefix, then
minecraft:will be assumed.
- in fact when you put a resource location without a prefix, then
Modifying the properties
Example
myEntity.x = 0
myEntity.y = 69
myEntity.z = 0
myEntity.motionY = 0.1
myEntity.noGravity = true
Breaking Down the Example
- myEntity
- Gets the variable that was made earlier.
- .
- The dot operator mentioned earlier.
- motionY = 0.1
- Instead of being a method, like last time, this is a beaned method.
- This means that there exists a method
setMotionand under the hood it runssetMotionY(0.1)that is automatically called with this code. - In this case it sets the
motionYproperty of the entity. -
You many not change arbitrary bits of NBT this way! Only bits that there is a method for. In the example, all of the lines are just running beaned methods. However, you can do it with a different method, listed in a different section below.
Spawning the entity
Example
myEnity.spawn()With understanding from the previous sections you should be able to figure out what this does.
It get myEntity, then calls the method .spawn().
This spawn() method creates the entity in the world.
Note: myEntity is still a variable! So you may not use let myEntity again within the scope! However this variable is still linked to the entity so calling myEntity.motionY = 0.1 will still set the vertical motion of the entity. (This can be a useful thing, but bad if you are unaware)
Creating the entity from a block
You can also call createEntity from a block! This is handy if you want to spawn the entity in the position of a block.
let myEntity = block.createEntity("cow")Again, block is just a place holder, you will need to change it to something else like maybe event.block for your code to work!
This does not spawn the entity in the center of the block, it just sets the entity's coordinates to that of the block, thus being misaligned
This code offsets the entity to be in the center of the block.
let myEntity = block.createEntity("cow")
myEntity.x+=0.5
myEntity.y+=0.5
myEntity.z+=0.5
Setting NBT
You can set the NBT to whatever you want! It's recommend using mergeFullNBT to do this.
myEntity.withNBT({VillagerData:{}})myEntity.fullNBT.VillagerData = {} will not work, because .fullNBT is a beaned method, not a property! The only thing that the beaned method lets do is to be able to use let nbt = myEntity.fullNBT to set a variable to NBT to be read or use myEntity.fullNBT = {} to set all of it at once.
Note it is fullNBT not nbt, because kubejs uses nbt for a different purpose. A bit confusing, but it is what it is.
Item Entities
There are two ways to create item entities in KubeJS.
popItem
If you want to easily create the item from a certain block then you can use the popItem method.
Example
block.popItem('minecraft:diamond')The item can be an Item.of() instead if you wish
createEntity("item")
Creating an item entity with a little more control be done identically to any other entity, except you get a couple more methods.
Example
let itemEntity = block.createEntity("item")
itemEntity.y+=0.8
itemEntity.x+=0.5
itemEntity.z+=0.5
itemEntity.item = Item.of("encahanted_book").enchant("thorns",2)
itemEntity.item.count = 1
itemEntity.pickupDelay = 600
itemEntity.noGravity = true
itemEntity.motionY = 0.08
itemEntity.spawn()
In this example
- the .item beaned method is used to set the item of the item stack (Required)
- the .pickupDelay beaned method is used to set the pickup delay (Optional)
Examples
Spawns an endermite when braking dirt with a 5% chance
onEvent("block.break", event => {
	if (event.block.id != "minecraft:dirt" || Math.random()  > 0.05) return
  	//only if its dirt and only has 5% chance
  	let myEndermite = event.block.createEntity("endermite")
  	myEndermite.x += 0.5
  	myEndermite.y += 0.5
  	myEndermite.z += 0.5
  	myEndermite.spawn()
})
Turns gravel to sand and drops clay when right clicked with flint
onEvent('block.right_click', event => {
  if (event.block.id == 'minecraft:gravel' && event.item.id == 'minecraft:flint') {
    event.block.set('sand')
    event.item.count--
    event.block.popItem('clay')
  }
})
Overrides enchanting table behavior when clicking on it with an item in you hand. Instead will make the item float up a while, then fall back down.
onEvent('block.right_click', event => {
    if (event.block.id !='minecraft:enchanting_table') return
    if (event.item.count == 0) return
  	event.cancel()
    let item = event.item.copy()
    //if did not use .copy() the item would still be referencing the one in the hand, so setting the count to 1 would set the count in the hand to 1
    item.count = 1
  	event.item.count--

    let itemEntity = event.block.createEntity('item')
    itemEntity.y+=0.8 // on the top of the encahnting table, not in it
    itemEntity.x+=0.5
    itemEntity.z+=0.5
    itemEntity.item = item
    itemEntity.item.count = 1
    itemEntity.pickupDelay = 100
    itemEntity.noGravity = true
    itemEntity.motionY = 0.08
    itemEntity.spawn()

  	function callback (i) {
    	//changes the scope of itemEntity (otherwise if used 2 times in a row within 5 seconds, problems would occur)
    	event.server.scheduleInTicks(100, callback => { // this code runs 5 seconds later
    		i.noGravity = false
    	})
    }
  	callback(itemEntity)
})